
Lift System Parts
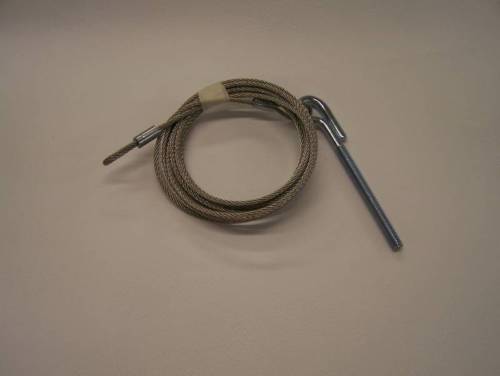
Starcraft Lifter Cable 105-1/2 Overall Length 3/32 Ss 4″ Eyebolt
SKU: PA-STAR3305-4046
$18.90
Part details
Front Lifter Cable for Vintage Starcraft Campers (105 1/2" / Part No. 3305-4046)
This is a 105 1/2-inch replacement Front Lifter Cable for a specific range of vintage Starcraft pop-up campers. In the Starcraft repair manual for 1982 and older models, this part is referred to as an "Outside Cable". Its function is to connect the central yoke to the front corner lifter assemblies, transferring the pulling force from the winch. This is a direct replacement for a broken, frayed, or stretched original cable.
Important Shipping Information
Please allow up to 1 week for this cable to ship.
Product Specifications & Compatibility:
- Part Number: 3305-4046
- Location: Front Left & Front Right Corner Lifter Cable
- Overall Length: 105 1/2 Inches
- Cable Diameter: 3/32 Inch
- End Fitting: 4-inch Stainless Steel Eyebolt
Compatibility Guide
According to the provided parts chart, this cable (3305-4046) fits the Front Left and Front Right positions on the following models:
- 1975: TRAILSTAR & TRAILSTAR XL
- 1976: STARLETTE & STARLETTE XL
- 1977: STARLETTE & STARLETTE XL; VENTURE CHALET 760
- 1978: STARMATE; VENTURE CHELSEA CL
- 1979: STARMATE; VENTURE CHELSEA
- 1980: STARFLYER 1706 & 1706 XL; VENTURE ABBEY XL 1706
Installation: Replacing a Lifter Cable (1982 & Older Tongue-Winch System)
Safety: Care must be taken during the entire procedure not to dislodge the support stud. Lower the upper door whenever the camper top is raised.
- Era check: this procedure is for the older system — a tongue-mounted winch with ONE main cable to a 4-way yoke. If your winch has FOUR cables with turnbuckles, use the 1985–2000 guide instead.
- Cut a 42" 2×4 support stud. Release the four roof hold-down latches and raise the hard top (assistance may be needed if the cable is badly frayed or broken).
- Raise the unit front for access to the yoke assembly; place jack stands under the front corners of the main frame. Wedge the support stud firmly under the corner the damaged cable leads to, and lock the winch.
- Lower the roof 3"–4" onto the stud. Remove the lifter cable eyebolt from the yoke underneath the unit and cut the cable behind the clamp so it will thread through the pulleys and out of the frame.
- Pull out the bunk assembly; from inside the unit remove the lifter cover and bottom plate (you may need to remove drawers, seat tops, etc.).
- Free the base pulley nut just enough to spread the pulley sides apart, remove the 1/4" bolt attaching the cable loop to the lifter, and slip the old cable out through the spread pulley.
- For an inside cable, continue with lifter channel disassembly per the guide (steps 10–16).
- Install the new cable per the guide’s installation sequence — note the mounting difference: right-front/left-rear cables mount differently than left-front/right-rear (see Figure 5-12 on the guide).
- The outside cable loop must point DOWN. Test by pulling the cable from under the unit — the lifter assembly should rise.
Full guide with diagrams, maintenance tips, and troubleshooting: Starcraft 1982 & Older Guide.
Listed fitments (23)
Check your model, lift system and cable position against these listings and the part details.