
Lift System Parts
Jayco Lift Post 3 Stage – 1994+
SKU: PA-JAYC0071510
$113.40
Part details
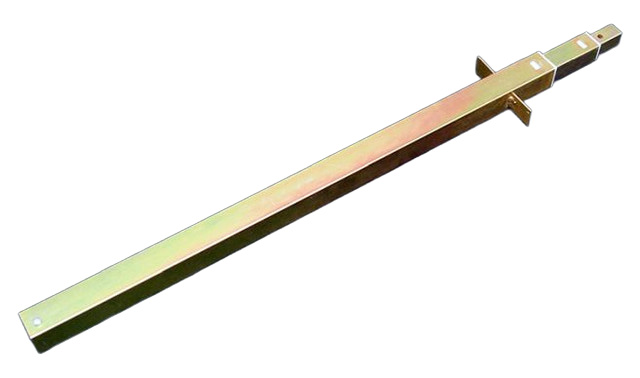
Jayco 3-Stage Telescoping Lift Post (1994+)
This is a complete replacement 3-stage telescoping corner lift post for Jayco pop-up campers manufactured in 1994 and later. This post is a component of the L&W lift system used in these campers. If your original corner post is severely bent, rusted, or structurally compromised, this is the direct replacement assembly you need to restore the safety and function of your camper's roof.
Is This The Correct Post For You?
Please verify the following before ordering:
- Check Your Model Year: This post is for Jayco campers made in 1994 and newer.
- Confirm Your Stage Count: To verify you have a 3-stage post, raise your camper roof to its full height. You should see two movable, visible telescoping sections. (2 visible sections + 1 base section = 3 stages).
Product Details:
- Type: 3-Stage Telescoping Lift Post.
- Compatibility: For Jayco campers (1994 and newer models) using the L&W lift system.
- Function: Replaces a damaged corner post to ensure the roof is properly and safely supported.
- Sold Individually: The price listed is for one corner post.
Installation: Replacing L&W Telescoping Lift Arms / Posts
Safety: Prop the roof with solid supports before servicing. After any repair, raise and lower the roof several times and confirm the door seats properly.
- Raise the roof and securely brace all four corners, bracing between the end-wall cap and the roof “H” rail.
- Remove the tent from the curtain track at the top of the roof side.
- Remove the lift arm cover and the screws from the sidewall cap; lift the cap up. Do not untuck the tent.
- Remove the top arm bolt. CAUTION: only replace one arm at a time.
- Crank the winch all the way down.
- Remove the old arm by lifting it out of the sidewall pocket.
- Install the new arm, ensuring the screw in the bottom of the arm faces the inside of the camper.
- Reverse the previous steps to reassemble, then adjust the final roof height (targets are in the guide).
Full guide with diagrams, maintenance tips, and troubleshooting: L&W Lift System Guide.
Listed fitments (1)
Check your model, lift system and cable position against these listings and the part details.