
Lift System Parts
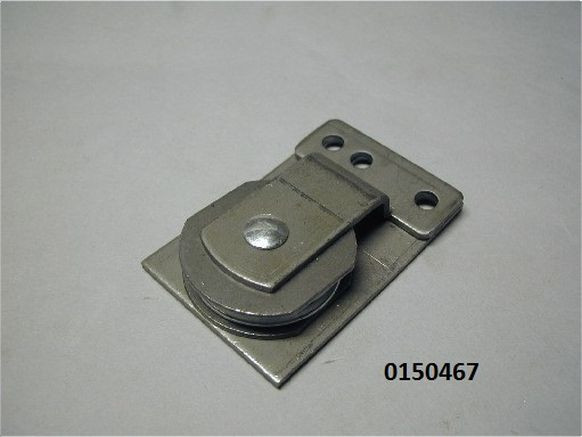
Jayco Pulley, 1 1/2″ W/ Flat Floor Bracket
SKU: PA-JAYC0150467
$26.25
Part details
1 1/2" Pulley with Flat Floor Bracket for Jayco L&W Systems
This is a replacement 1 1/2-inch pulley with a flat, floor-mounted bracket for Jayco pop-up campers using the L&W lift system. The L&W repair manual confirms the use of floor-mounted pulley brackets within the system. This assembly bolts directly to the floor of the camper to guide a lift cable, ensuring a smooth, low-friction path.
A worn-out or seized pulley can cause grinding noises, create excessive drag in the system, and will quickly fray and destroy the lift cables. Replacing a faulty pulley assembly is critical to protecting your cables and ensuring the lift system is easy to operate.
Product Details:
- Jayco Part Number: 0150467
- Pulley Diameter: 1 1/2 Inch
- Mounting: Flat Floor Bracket
- Function: Guides a lift cable from a floor-mounted position.
- Compatibility: For Jayco campers using the L&W lift system[cite: 40].
- Sold as a complete assembly.
Installation: Replacing an L&W Pulley / Pulley Bracket
Safety: Prop the roof with solid supports before servicing. After any repair, raise and lower the roof several times and confirm the door seats properly.
- Raise the roof and brace it securely.
- Crank the winch down 4–5 turns.
- Remove the bolts from the pulley track (pulley brackets are on the sidewall and floor in the opposite corner from the winch).
- Break the pin weld on the bracket and pry it apart: drill through the bracket from the backside to remove the weld area, or split the two metal pieces with a chisel.
- Remove the cables from the pulley, noting whether they ride on the top or bottom side of the pulley.
- Break the pin weld on the new bracket (drill from the backside) and place the cables back in the same position.
- The new bracket does not need to be welded; a bolt will hold it once it is back in place.
- Reverse the previous steps. Make sure the cables do not rub on the wheel well, then adjust the final roof height.
Full guide with diagrams, maintenance tips, and troubleshooting: L&W Lift System Guide.
Listed fitments (1)
Check your model, lift system and cable position against these listings and the part details.